Διαφορά μεταξύ των αναθεωρήσεων του «Null modem Cable»
(HaWKWgChYKBjzawK) |
Itmy (συζήτηση | συνεισφορές) μ (Κλειδωμένο Null modem Cable [edit=autoconfirmed:move=autoconfirmed]) |
||
| (301 ενδιάμεσες εκδόσεις από 5 χρήστες δεν εμφανίζονται) | |||
| Γραμμή 1: | Γραμμή 1: | ||
| − | + | ==Introduction== | |
| − | + | Null Modem Cable is used to connect through a serial connection to the routerboard console using a utility like minicom or hyperterminal. The official name of the cable is "Null modem with loop back handshaking". These cables are not widely available in retail stores so you will most probably have to hack a standard serial cable into a null one by opening up both connectors and rearranging the cable connections to one of them. | |
| − | + | ||
| − | + | ==Making the cable== | |
| − | + | Tips: | |
| − | + | *The best way to do it is by soldering the wires to the connector. So most of the tips apply to this case. | |
| − | + | *All serial connectors have their pins numbered in both sides. This is really useful when you rearrange the wires, because thinking of the connector schematic can be really confusing. | |
| − | + | *Careful with the ground wire! Don't forget to put the insulating cover! | |
| − | + | *Don't heat up to much the connector pins because you may damage the connector. | |
| − | + | *Check the connections with an ohmmeter. | |
| − | + | ||
| − | + | [[Εικόνα:Null modem.png]] | |
| − | + | <table border=1> | |
| − | + | <tr><th>Connector 1</th><th>Connector 2</th><th colspan="3">Function</th></tr> | |
| − | + | <tr ><td>1 + 4 + 6</td><td>1+4+6</td><td align="left">DTR</td><td align="left">CD + DSR</td></tr> | |
| − | + | <tr ><td>2</td><td>3</td><td align="left">Rx</td><td align="left">Tx</td></tr> | |
| − | + | <tr ><td>3</td><td>2</td><td align="left">Tx</td><td align="left">Rx</td></tr> | |
| − | + | <tr ><td>5</td><td>5</td><td align="left" colspan="3">Signal ground</td></tr> | |
| − | + | <tr ><td>7 + 8</td><td>7+8</td><td align="left">RTS</td><td align="left">CTS</td></tr> | |
| − | + | </table> | |
| − | + | ||
| − | + | ==Connecting to RB == | |
| − | + | Ok, so now you have a null cable. What now? | |
| − | + | ||
| − | + | -Connect the cable to both the rb and the serial port of your pc. | |
| − | + | ||
| − | + | -Set-up a connection in your hyperterminal/minicom. You need to specify: (at least for rb532 - others may need different options) | |
| − | + | *Serial port (COM1 - /dev/ttyS1) | |
| − | + | *Baud Rate (115200 bits per second) | |
| − | + | *8 data bits | |
| − | http:// | + | *no parity |
| − | + | *1 stop bit | |
| − | http:// | + | *no hardware folow control |
| − | + | ||
| − | + | Then you initiate the call and power-on the routerboard. If you are lucky you will immediately see some text spitted out by the rb. If not try changing some of the settings (usually serial port). | |
| + | |||
| + | Sources: | ||
| + | http://www.lammertbies.nl/comm/info/RS-232_null_modem.html | ||
| + | http://wiki.mikrotik.com/wiki/Serial_Console | ||
Τελευταία αναθεώρηση της 10:56, 23 Δεκεμβρίου 2008
Introduction
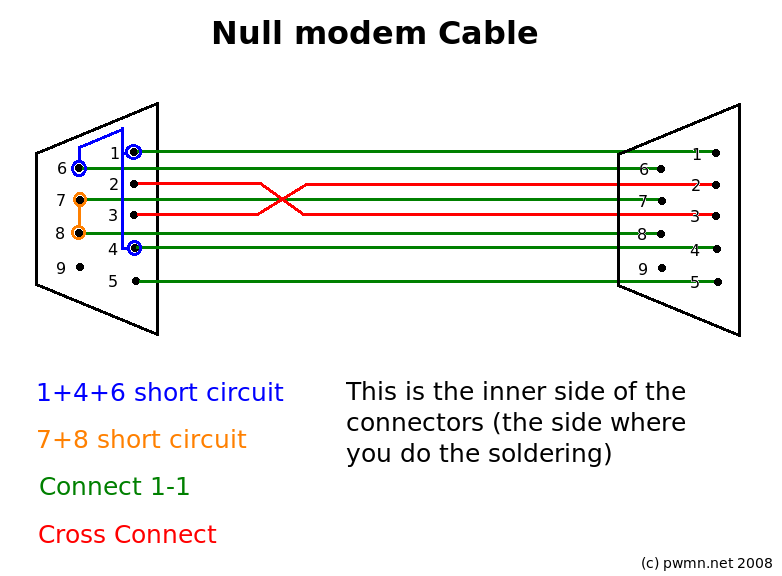
Null Modem Cable is used to connect through a serial connection to the routerboard console using a utility like minicom or hyperterminal. The official name of the cable is "Null modem with loop back handshaking". These cables are not widely available in retail stores so you will most probably have to hack a standard serial cable into a null one by opening up both connectors and rearranging the cable connections to one of them.
Making the cable
Tips:
- The best way to do it is by soldering the wires to the connector. So most of the tips apply to this case.
- All serial connectors have their pins numbered in both sides. This is really useful when you rearrange the wires, because thinking of the connector schematic can be really confusing.
- Careful with the ground wire! Don't forget to put the insulating cover!
- Don't heat up to much the connector pins because you may damage the connector.
- Check the connections with an ohmmeter.
| Connector 1 | Connector 2 | Function | ||
|---|---|---|---|---|
| 1 + 4 + 6 | 1+4+6 | DTR | CD + DSR | |
| 2 | 3 | Rx | Tx | |
| 3 | 2 | Tx | Rx | |
| 5 | 5 | Signal ground | ||
| 7 + 8 | 7+8 | RTS | CTS | |
Connecting to RB
Ok, so now you have a null cable. What now?
-Connect the cable to both the rb and the serial port of your pc.
-Set-up a connection in your hyperterminal/minicom. You need to specify: (at least for rb532 - others may need different options)
- Serial port (COM1 - /dev/ttyS1)
- Baud Rate (115200 bits per second)
- 8 data bits
- no parity
- 1 stop bit
- no hardware folow control
Then you initiate the call and power-on the routerboard. If you are lucky you will immediately see some text spitted out by the rb. If not try changing some of the settings (usually serial port).
Sources: http://www.lammertbies.nl/comm/info/RS-232_null_modem.html http://wiki.mikrotik.com/wiki/Serial_Console
