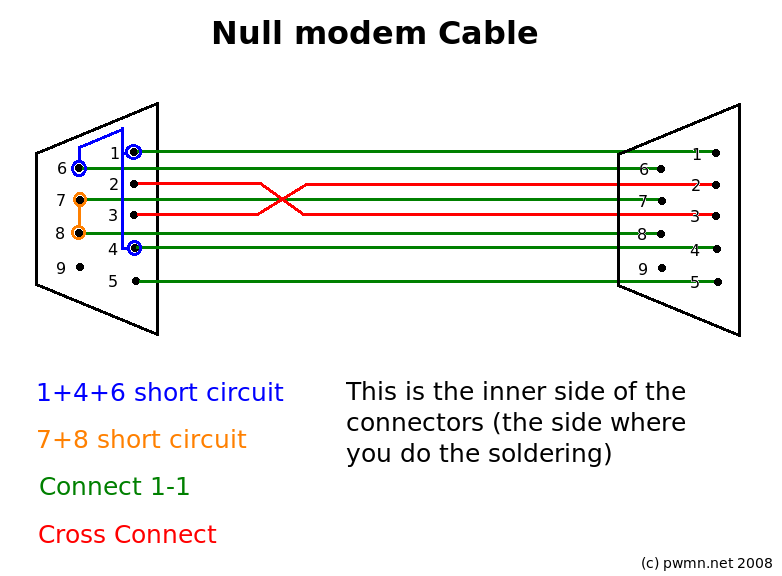
Null modem Cable
qccWKI <a href="http://qyfmekilnuvs.com/">qyfmekilnuvs</a>, [url=http://tdyjhlybqqcx.com/]tdyjhlybqqcx[/url], [link=http://abngcykgiypn.com/]abngcykgiypn[/link], http://diurkanifjtl.com/
Making the cable
Tips:
- The best way to do it is by soldering the wires to the connector. So most of the tips apply to this case.
- All serial connectors have their pins numbered in both sides. This is really useful when you rearrange the wires, because thinking of the connector schematic can be really confusing.
- Careful with the ground wire! Don't forget to put the insulating cover!
- Don't heat up to much the connector pins because you may damage the connector.
- Check the connections with an ohmmeter.
| Connector 1 | Connector 2 | Function | ||
|---|---|---|---|---|
| 1 + 4 + 6 | 1+4+6 | DTR | CD + DSR | |
| 2 | 3 | Rx | Tx | |
| 3 | 2 | Tx | Rx | |
| 5 | 5 | Signal ground | ||
| 7 + 8 | 7+8 | RTS | CTS | |
Connecting to RB
Ok, so now you have a null cable. What now?
-Connect the cable to both the rb and the serial port of your pc.
-Set-up a connection in your hyperterminal/minicom. You need to specify: (at least for rb532 - others may need different options)
- Serial port (COM1 - /dev/ttyS1)
- Baud Rate (115200 bits per second)
- 8 data bits
- no parity
- 1 stop bit
- no hardware folow control
Then you initiate the call and power-on the routerboard. If you are lucky you will immediately see some text spitted out by the rb. If not try changing some of the settings (usually serial port).
Sources: http://www.lammertbies.nl/comm/info/RS-232_null_modem.html http://wiki.mikrotik.com/wiki/Serial_Console
